Example Asbestos Removal Projects in Edina

Seven example jobs from Edina, Richfield and Hopkins follow, from three samples to a full teardown. Every card lists the samples, the removal work, the days on site and an estimated cost.

Kitchen wall and ceiling tested before a range hood duct is run outside

Example project

Home
1960s one-story rambler in Edina with its original kitchen layout
Original request
Replace a recirculating hood with one that vents through the outside wall
Testing
Three samples by an MDH-certified inspector: the ceiling texture, the joint compound on the outside wall and the soffit above the cabinets
Found
No asbestos in any of the three samples
Timeline
A one-hour visit, and the lab results within a few days
Estimated testing cost
$400

Scope of work

A visit by an MDH-certified inspector, three samples from the spots the duct will pass through, lab results for each one and a short written report for the installer. No removal was needed in this example.

Project overview

In this example, the owners of a 1960s rambler in Edina are tired of cooking smells that never leave the kitchen. Their installer will mount a new hood and run its duct through the cabinet soffit and out the wall, which means cutting into the ceiling, the soffit and the outside wall.

An MDH-certified inspector takes one sample from each of the three surfaces. All three come back with no asbestos, and the installer cuts the opening the next week with the report on file.

The goal

The goal is a vented hood installed on schedule, with written results for every surface the duct passes through.

Process

  1. First visit An MDH-certified inspector takes three samples where the installer marked the duct path.
  2. Lab Each sample is tested on its own at an accredited lab.
  3. A few days later The report lists the three spots and a result for each.
  4. Then The installer schedules the cut with the report in hand.

Planning right

  • Mark the duct path before the visit, so the samples come from the right spots.
  • Ceiling texture in other rooms is a separate question and needs its own sample.
  • Keep the report with the house papers for the next project.
  • A clean result covers only the materials and spots that were sampled.
Get a free quoteMore about asbestos testing and inspections

Hall and living room texture scraped before a whole-house fan is cut in

Example project

Home
1970s split-level in Edina with one continuous textured ceiling over the upper hall and living room
Original request
Cut an opening in the hall ceiling for a whole-house fan and smooth the ceiling around it
Testing
An MDH-certified inspector cuts two small pieces of the ceiling texture for the lab
Found
Asbestos in the sprayed texture
Area
About 220 sq ft of ceiling
Work
Upper hall and living room enclosed, negative air on, texture wetted down and bagged as it comes off
Timeline
Five-day notice, then two working days
Cost
$3,100

Scope of work

Two texture samples first, and MDH hears from us five days before the work. We empty the upper hall and living room, wrap them in plastic under negative air, and take down the smoke alarm and the light. Damp texture is scraped into leak-tight bags; air samples and a final clean follow, and the waste goes out under a manifest. The whole-house fan, wiring, skim coat and paint cost extra.

Project overview

In this example, the owners of a 1970s split-level in Edina want a whole-house fan to pull cool evening air through the house. The installer will cut a large opening in the upper hall ceiling, and that texture runs without a break into the living room.

The texture tests positive, so the opening waits. A licensed crew seals both spaces, scrapes the whole ceiling to bare board and leaves one smooth surface for the installer and the painter.

The goal

The goal is one bare ceiling over the hall and living room, so the fan goes in and the finish matches.

Process

  1. First visit An MDH-certified inspector takes two samples, and the fan opening is marked on the ceiling.
  2. Before work Sofas and tables go downstairs while the five-day MDH notice period runs out.
  3. Day one Hall and living room sealed, the texture scraped wet into bags.
  4. Day two Air is sampled and the rooms cleaned before the crew pulls down the plastic.

Planning right

  • Shut the bedroom doors along the upper hall before the crew hangs plastic.
  • Book the fan installer after the air samples are back.
  • Bedroom ceilings with the same texture can wait if nobody will disturb them.
  • Skim coating waits until the fan opening has been framed.

Get a free quoteMore about popcorn ceiling removal

Asbestos removed from a 1960s house so the builder’s demolition plans can be approved

Example project

Home
A builder’s newly bought 1960s Edina one-story with a walkout basement
Original request
Take the house down and build a new one on the same lot
Testing
An MDH-certified inspector works through every level, walkout basement up to the shingles, for a full survey
Found
Asbestos in the ceiling texture, the basement floor tile and the tape on the duct seams
Clear
No asbestos in the siding, the roofing or the kitchen floor
Timeline
Whole-house survey; MDH notice five days out; a five-day removal; wrecking no sooner than two days later
Cost
$16,000

Scope of work

The price covers everything the survey found positive. That means about 1,000 sq ft of ceiling texture, about 500 sq ft of tile on the basement floor and the tape on the duct seams. It also covers the MDH notice, leak-tight labeled bags, air samples, manifests and the closeout letter Edina’s plan review asks for. The survey and the wrecking are billed separately.

Project overview

In this example, a builder buys a 1960s house in Edina to replace it with a new one. Before Edina approves the demolition plans, its checklist asks for a closeout letter from a licensed abatement contractor, or a survey showing nothing needs removal, along with the Hennepin County pre-demolition notification.

The survey finds texture on most of the ceilings, tile on the walkout basement floor and taped duct seams. A licensed crew takes all of it out first. Once the last bags are gone, the builder gets the closeout letter for the plans and the receipts and manifests the county inspector asks for.

The goal

The goal is a house with nothing positive left inside and a closeout letter ready for the plan review, so the teardown keeps the builder’s schedule.

Process

  1. First visit An MDH-certified inspector surveys the whole house and garage; the report lists each positive material.
  2. Before work MDH gets five days’ notice, and the builder keeps the wrecking crew on hold.
  3. Removal days Ceilings, basement tile and duct tape removed inside sealed areas, room by room.
  4. Last step Closeout letter, receipts and manifests handed to the builder, at least two days before wrecking.

Planning right

  • Order the survey the week the purchase closes, so removal is not the hold-up.
  • The builder should have the survey, abatement receipts and manifests ready when Hennepin County inspects.
  • Include the garage in the survey if it comes down too.
  • Leave the utilities on until the crew is finished.

Get a free quoteMore about teardown and remodel abatement

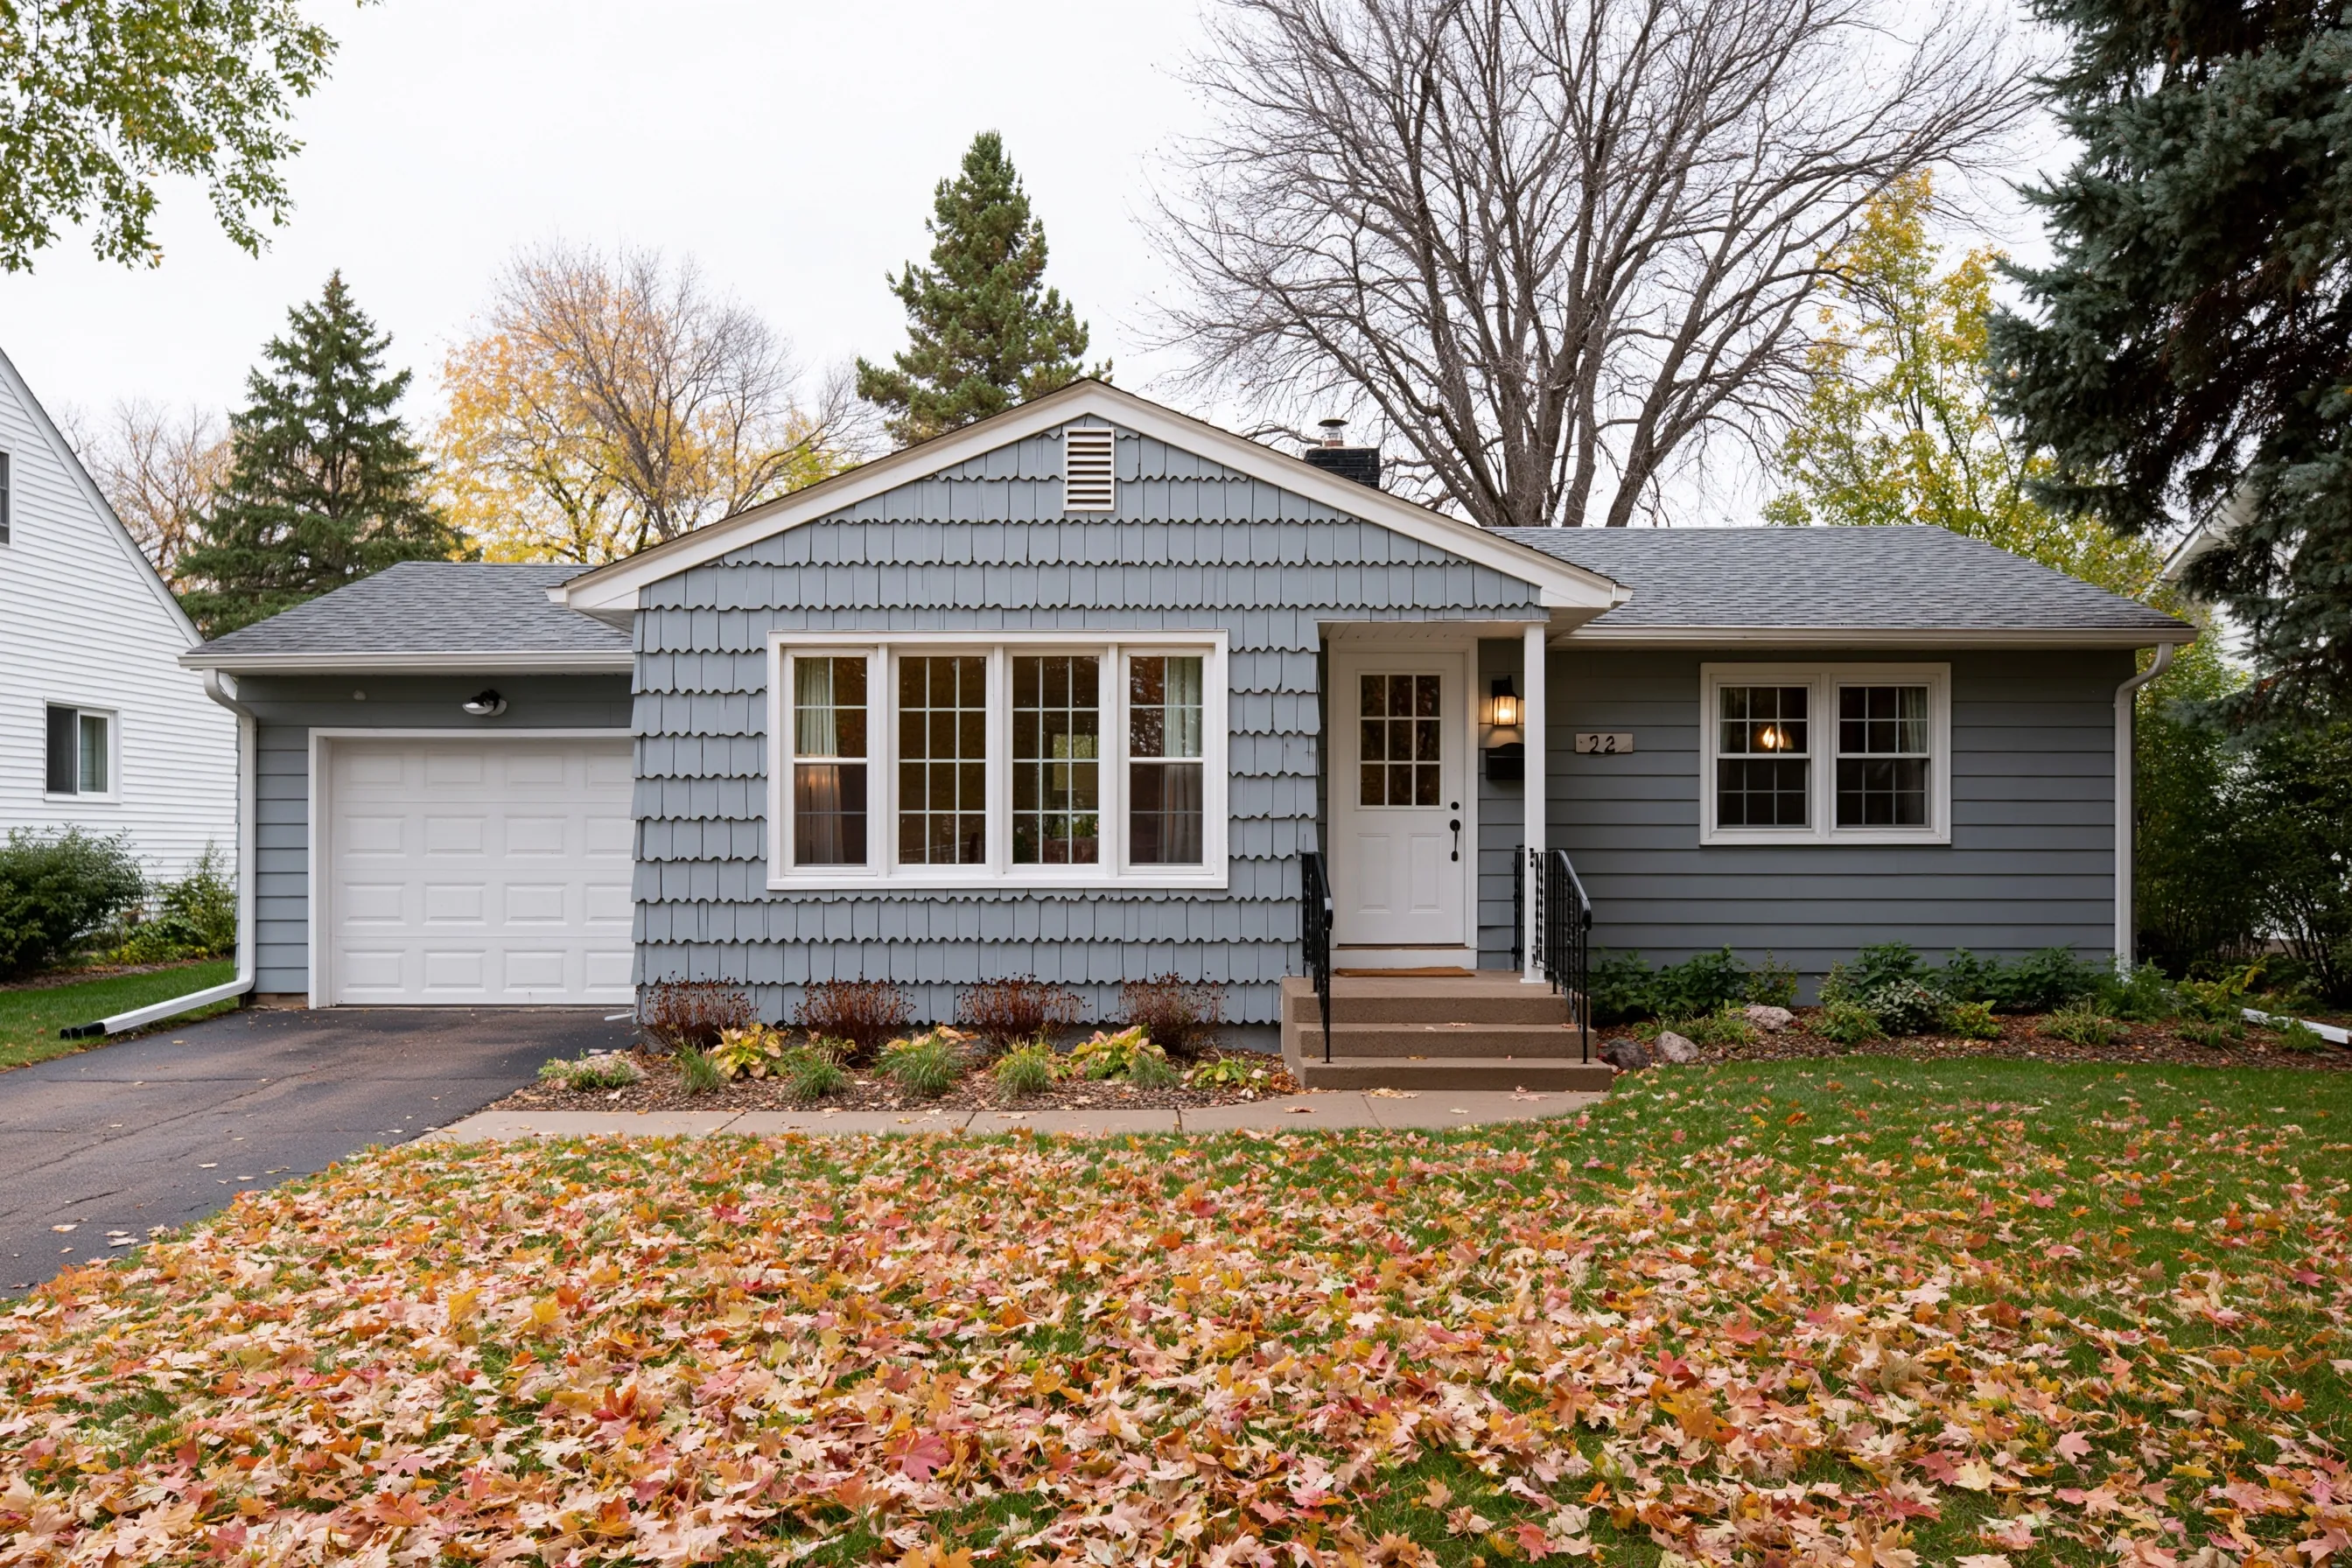
Cement shingles taken off a rambler’s front wall before stone veneer goes on

Example project

One-story 1950s rambler with gray cement shingle siding with wavy bottom edges, a small concrete stoop and an attached garage, autumn leaves on the lawn
Home
1950s one-story rambler in Edina with gray cement shingles on the front gable wall and an attached single garage
Original request
Replace the front shingles with stone veneer, keeping the siding on the rest of the house
Testing
Samples of the front shingles and the garage siding by an MDH-certified inspector
Found
Asbestos in the wavy-edged cement shingles
Clear
The garage’s newer siding is negative
Area
About 280 sq ft of front wall
Timeline
Five-day notice, then two working days
Cost
$3,800

Scope of work

Samples of both sidings, the MDH notice filed five days ahead, plastic laid along the foundation and the front beds, the shingles wetted and taken down whole where the nails let go, wrapped and labeled, hauled with a manifest, and the beds picked clean. The stone veneer, new sheathing wrap and trim are the mason’s work.

Project overview

In this example, the owners of a 1950s rambler in Edina want stone across the front gable wall, the part of the house everyone sees from the street. The mason needs the old shingles off and bare sheathing to work on.

The wavy-edged shingles test positive and the garage siding does not, so only the front wall is stripped. A licensed crew wets each shingle, pulls it whole and wraps the stack, and the flower beds are covered so no chips end up in the mulch.

The goal

The goal is a bare front wall that is ready for stone, with the rest of the siding left alone.

Process

  1. First visit Standing at the front gable, an MDH-certified inspector takes a shingle sample, then one from the garage siding, and tapes off the wall size.
  2. Before work Plastic goes over the front flower beds and the stoop once MDH has its notice.
  3. Day one Shingles wetted and taken down by hand, stacked and wrapped.
  4. Day two Last pieces off, the plastic bagged, and the wrapped siding hauled.

Planning right

  • Keep cars and bikes off the driveway side while the wall is open.
  • Ask the mason to look at the sheathing on the last day, before the crew leaves.
  • Trim the shrubs back from the wall before the crew arrives.
  • Shingles on other walls can stay if they are in good shape.

Get a free quoteMore about asbestos siding removal

Flaking texture removed from the pool room ceiling of a condo building

Example project

Building
1970s condo building in Edina, more than 50 units, with an indoor pool on the ground floor
Original request
Replace the flaking ceiling over the pool with a moisture-resistant ceiling
Testing
Around 6 samples from the pool room ceiling, walls and deck, collected by an MDH-certified inspector
Found
Asbestos in the sprayed texture on the concrete ceiling
Clear
No asbestos in the wall paint, the deck tile or the locker room ceilings
Area
About 700 sq ft of ceiling
Timeline
A survey, then MDH and MPCA notices (the MPCA one ten working days ahead), then four days in the pool room
Cost
$6,600

Scope of work

A survey of the pool room, the MDH and MPCA notices, the pool closed and the deck and basin covered in plastic, the room sealed off from the halls and locker rooms under negative air, the texture misted and scraped into leak-tight labeled bags, air clearance before the room reopens and the haul with its manifest. The new ceiling is built by another contractor.

Project overview

In this example, the association of a 1970s condo building in Edina sees the ceiling over its indoor pool shedding flakes into the water. The plan is a new ceiling built for damp air, and the old sprayed texture has to come off the concrete first.

The texture tests positive. The building has far more than four units, so the MPCA notice goes in ten working days ahead along with the MDH notice. The pool closes for the week, and a licensed crew seals the room off from the halls before any scraping starts.

The goal

The goal is a bare concrete ceiling ready for the new one, with the pool closed for a single week.

Process

  1. First visit Ladder up over the pool: an MDH-certified inspector takes samples of the ceiling, walls and pool deck and sends the building manager the report.
  2. Before work MDH and MPCA notified; owners get a notice with the pool closing dates.
  3. Days one to three Room sealed, the deck and basin covered, the texture scraped wet into bags.
  4. Last day Clearance samples pass, the plastic comes down, and the ceiling crew takes over.

Planning right

  • Post the closing dates by the elevators and the pool door.
  • The locker rooms stay locked as long as the pool room is under plastic.
  • File the survey with the association records, with every sampled spot marked.
  • The ceiling contractor and electrician can be booked once clearance results arrive.

Get a free quoteMore about popcorn ceiling removal

Wrapped branch ducts removed so two kitchen floor registers can move

Example project

Home
1950s one-story house in Richfield with branch ducts under the kitchen floor
Original request
Move two floor registers that the new cabinet layout would cover
Testing
Samples of the branch duct wrap and the joint tape by an MDH-certified inspector
Found
Asbestos in the wrap and tape on the two branch runs under the kitchen
Clear
No asbestos in the tape on the main trunk
Area
About 30 sq ft of wrap and tape
Timeline
Five-day notice, then one working day
Cost
$2,100

Scope of work

Samples of the wrap and each tape, the MDH notice filed five days ahead, the basement ceiling under the kitchen sealed in plastic under negative air, the wrap and tape wetted and cut free from both branch runs, leak-tight labeled bags, air samples and the haul with its manifest. The new duct runs and registers are extra.

Project overview

In this example, the owners of a 1950s house in Richfield are redoing their kitchen. The new cabinets cover two floor registers, so the heating contractor has to cut the old branch ducts in the basement and run new ones to fresh spots.

The wrap and tape on those two branches test positive; the main trunk does not. A licensed crew strips just the two runs, and the heating contractor cuts and reroutes them on bare metal.

The goal

The goal is two bare branch runs, so the registers move and the cabinets go in on time.

Process

  1. First visit From the basement, an MDH-certified inspector takes samples of the duct wrap and the seam tape under the kitchen and measures the two branches.
  2. Before work MDH is notified, and the owners clear the storage shelving that sits below the kitchen floor.
  3. Work day Basement ceiling sealed, the wrap and tape taken off wet, air samples taken.
  4. Then The heating contractor reroutes the ducts before the cabinets arrive.

Planning right

  • Keep the furnace off while the crew works on the ducts.
  • Have the cabinet plan final before the visit, so only the right runs are stripped.
  • Share the lab report with the heating contractor.
  • Pipe wrap in the same basement needs its own sample.

Get a free quoteMore about duct, furnace and pipe insulation removal

Floor tile lifted in a lower-level corner before a home sauna is built

Example project

Home
Hopkins split-entry from the 1970s; tile floor in the lower-level family room
Original request
Build a small sauna in one corner on bare concrete, with a floor drain
Testing
An MDH-certified inspector sends the 12-inch tile and the black mastic to the lab as two separate samples
Found
Both the floor tile and its black mastic tested positive
Area
About 70 sq ft in the corner
Work
Whole tiles pried up wherever they let go; black mastic scraped off while kept wet
Timeline
Five-day notice, then one working day
Cost
$1,950

Scope of work

We test the tile and the mastic separately and give MDH five days’ notice. Plastic walls off the corner, the tiles come up in one piece where they can, and the mastic is kept wet and scraped down to concrete. Labeled bags, a HEPA clean and a manifest for disposal finish the job. The sauna builder, the drain and any new flooring are priced on their own.

Project overview

In this example, the owners of a 1970s split-entry in Hopkins want a small sauna in the lower-level family room. The builder will cut a drain into the slab and set the sauna on bare concrete, and old tile covers that corner.

Results come back positive for the tile and for the mastic. The crew removes about 70 sq ft, just the footprint of the sauna, and the rest of the family room tile is not touched.

The goal

The goal is clean concrete in one corner for the sauna, with the rest of the family room tile left alone.

Process

  1. First visit The sauna builder chalks the corner outline, and an MDH-certified inspector cuts a tile sample and a mastic sample inside it.
  2. Before work The family pulls the couch and TV out of the sauna corner during the five-day notice.
  3. Work day The sauna corner goes under plastic; the crew pops the tiles, wets and scrapes the mastic, and HEPA-vacuums the slab.
  4. Then The builder cuts the drain and frames the sauna.

Planning right

  • Ask the builder to mark the sauna footprint and the drain before the crew comes.
  • The tiles outside the sauna corner are fine to leave where they are, covered or not.
  • The stairway door down to the family room stays shut until the plastic is gone.
  • Plan the drain cut for after the bags are gone.

Get a free quoteMore about floor tile and mastic removal

Request a free asbestos removal quote

We recommend calling, but do feel free to contact us using this form. We'll get back to you with a free, personalized quote or additional questions as soon as possible. We're here to help.

Call (952) 395-8613

Call (952) 395-8613